Thursday, October 6, 2016

Kaiser House Advent Calendar


It's been a two year break since my last post. That's a bit scary but that's how long it's been since 'Paradise' closed down. It took a long time for reality to sink in but all is great now! For the last couple of years, I've been making samples and helping out with demos and sales for a great online shop called Scrap Shotz at the annual Creative Scrapbooker Carnival in Calgary. It seems like very year, I make one or more Kaiser Advent calendars for them and this year was no exception. After multiple searches, I determined that this house had no instructions available so I took pictures of the assembly process and hopefully this will help someone.


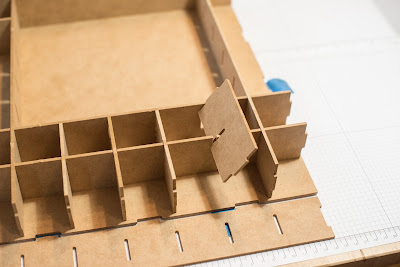
Kaiser Advent House Step by Step Pictorial Assembly

These pictures depict what you get in your package.


I used Aleene’s Tacky Glue for the box assembly and just held them in place for just under a minute to make sure that they would hold. The glue dries white and I didn’t wipe the excess glue on the outside of my boxes but I did wipe them smooth with my finger on the outsides.

I just used regular household shears to cut my pieces and it did a pretty good job so I did not sand.


I also use Aleene’s tacky glue to assemble all the pieces. Just run a line of glue where any edges meet.
The calendar will be a little harder to assemble if you paint all of the pieces first. If you choose to paint first, be prepared to use a little muscle to get the ends in the slots as the wood will swell.

I will try to add pictures of the assembled roof when I get a chance but I don't physically have the calendar to take the pictures.

Enjoy!

Monday, September 8, 2014

My Summer project is done!....and so is Summer????

I did a 'Pay it forward' challenge this Summer and when I signed up, I knew exactly what I was going to do. I love this kind of project when I get to try something NEW!

I made some personalized note cards for each of my 5 peeps with custom envelopes and a little custom box to house each of them. I hope they're put to good use.....as soon as I deliver them.


My challenge was to get these done in the Summer and they are but I think something has happened to the Summer.........It looks like it's GONE!


Today is September 8th and therefore it is officially still Summer. This is our forecast for the next three days. The weather outside is 0 degrees Celsius or 32 Fahrenheit for my American friends. 

I can't believe it was so HOT on the weekend.


Hope you're keeping warm,


Sunday, July 6, 2014

Give your knob a NEW style!

My kitchen cabinet knobs were in style back in the '90's. .

So, here is the BEFORE picture.

Those centers actually match my counter tops. We are planning a few changes in the not too distant future but in the meantime, I thought that just changing the knobs would be a rather significant change


This is the AFTER picture and below are a few more pictures of the process.


I figured that anything 'Tim' would be an update so I started with a pad of his papers and cut this into the appropriate sized circles. But, first I had to pop out the laminate from the original knobs....(not easy) and then after cleaning out all of the residue and oils, I spray painted the brass knobs with a brushed metallic 'Oil rubbed Bronze' Krylon paint.


I needed 1 1/4" circles and didn't have that size punch so I looked through any of my dies that had a circle and found one with the correct size. In the end it would have been quicker to use an electronic die cut machine.


I used the 'Ice Resin' on top of each of my paper discs and let these dry overnight. 


And..........now here are my 'NEW' knobs!


I'm quite happy with the result and it all happened because...................I Scrap and Stash!

I got everything except for the spray paint at Scrapbooker's Paradise on Macleod Trail and the paint next door at Rona.

Saturday, June 7, 2014

Resin Fun and a few Instructions

Here is an amazing product that I recently got to use for a project. The best part about this resin is that there is no measuring involved. When you press down on the plunger, the right amounts go into your container and you mix for a minute. If you've used resin before, you usually have complicated measurements and it takes more than a minute to mix.

Once you're done, with the mixing, just pour onto your object and the product is self levelling so it will just run to the edges and stop. If your surface is not level, you may get a bit of overflow but this is easy to clean up.

These next images show the product when it was freshly poured. It is very clear and there are now bubbles.


After 10 - 12 hours of curing, the items are dry to the touch and can be handled without destruction. At this time they are still malleable and can be re-shaped to suit your needs. I taped the butterfly wings below to my desired shape and waited until it was fully cured.

For me this is a great way to use up any stickers or layered stickers. I'm not much of a sticker user so this is the perfect solution for me. I love how the sticker glasses below turned out.


Here is my acetate butterfly after shaping.


 I used one of the smaller circles of my 'Perfect Squares' to shape my die cut bottle.


 Here si what it looks like when it is completely cured.


Here is the card that I made for Scrapbooker's Paradise Blog.......for tomorrow's post.......
 "Father's Day is only a week away!!!"


 You have to give this stuff a try. It's so easy to use and the results are amazing!

Sunday, June 1, 2014

Storage Idea share-sies!!!

A huge part of scrapbooking and card-making is coming up with great storage solutions. The first twelve mini inks arrived a few months ago and I was never happy with the way that I had them stored. I just had them in three stacks of four and I always had to take them apart to see which color was underneath. Inevitably, every time that I picked up a pile, they would fall apart and I had to find the right lid for the right ink.

I knew then that no matter how I stored my inks, I was going to have to label them but first here is my new storage idea.


Each of these containers will fit 15 mini inks and best of all, they only cost $1.00 each.


In one of the containers, I can get 9 ink pads in it and the two mini ink 1" round blending tools.


Here si the second container with 15 inks and they are all labelled. I use a thin smudge proof photo paper for this kind of labeling so that even the longest names fit on a small area. I just use Scor-Tape to adhere them to the ink part of the containers. 


I wanted to be able to shake my box and know that my inks will not be displaced so I just adhered a layer of packing foam to the inside covers.


There is a piece of foam on the underside of each ink container and it stays in place on its own.


The best part about these containers is the ability to remove an ink without having all of the others fall over. The ridges on the inside help keep everything in place. This is all 24 inks in a convenient easy to move box. I think that I will go out and buy a couple more of these now so that I'm ready for the next releases.

I hope that you enjoyed my little tip.

Saturday, May 24, 2014

Recycled Flower Power!!

I can't believe its been so long since I've posted anything and there really is no excuse. I haven't stopped creating, I just stopped sharing for a while but all this will change.

On the Scrapbooker's Paradise Blog a couple of weeks ago, I shared a layout that I created by recycling a table decor that I had made for a demo table.

Here is the original flower......


Here is the layout...... complete instructions on Scrapbooker's Paradise Blog.


I had a big hole in the center of this flower when I took it my project and it was too big for a card so I just tore off all of the petals, shaped and overlapped them together in the center and stapled everything together.


And this is the Card that I made with the rest of the flower......


I was going to share my 'New' storage idea for my mini Distress inks in a couple of weeks but I will share this next week on this Blog. I can't wait to show you and so far it has been working great for me.

Until next week,